Setting up your GPS rover
Connect the Archer X8-M1 GPS rover to your phone and get an RTK fix in the field.
Platform: Mobile (Archer Setup app) + Archer X8-M1 GPS rover
The Archer X8-M1 is a high-accuracy RTK GPS rover that gives Archer a centimetre-level position fix — so your block boundaries, field features, and trouble spots line up with the real world.
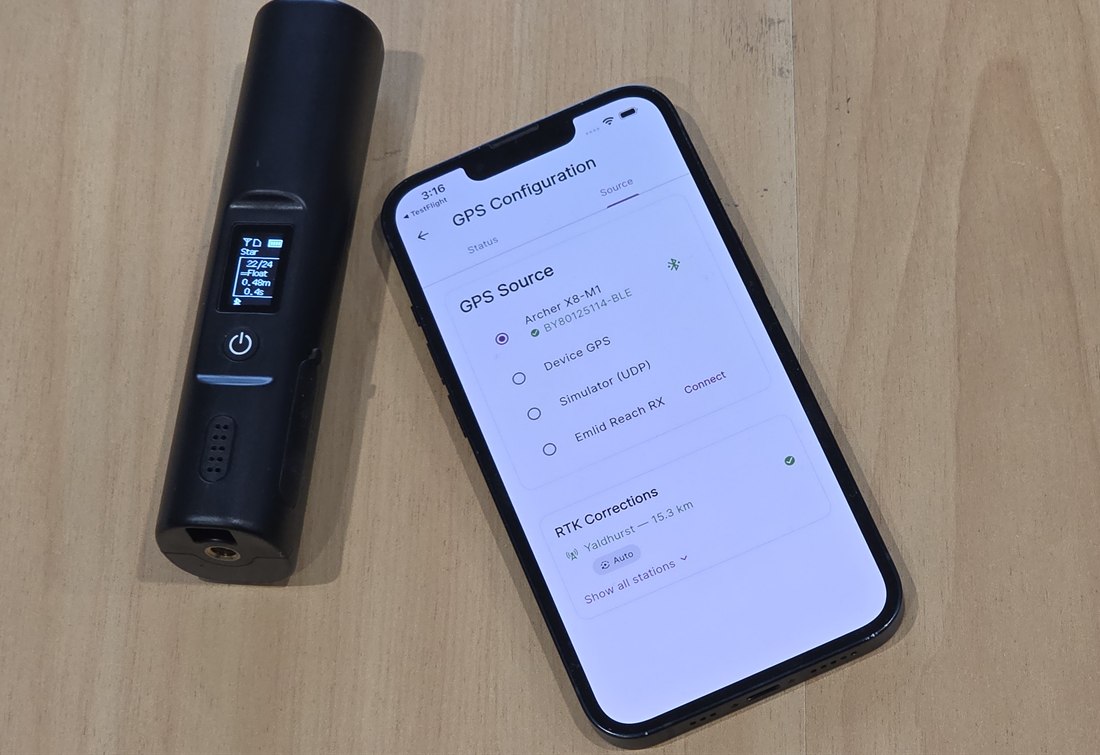
Set up in 3 steps
- Power on the rover somewhere with a clear view of the sky.
- In Archer, open the menu (☰) → GPS Configuration. The screen opens on the Source tab — tap Connect next to Archer X8-M1.
- Switch to the Status tab (the left tab) and wait for RTK Fix, then start mapping.
📷 Screenshot: The app drawer (☰) open, with the GPS Configuration menu item highlighted.
That's the whole flow.
💡 Shortcut. You can also tap the GPS status bar at the top of most screens to open GPS Configuration directly, instead of going through the menu.
⚠️ Won't connect? Nine times out of ten the rover is still linked to another device. Turn it off and on, keep just one phone nearby, and tap Connect again. More fixes below.
What you'll need
- The rover, charged or powered.
- The Archer app, signed in, with the right management group selected.
- A mobile data signal on your phone — RTK corrections reach the rover through the app.
- A clear view of the sky for an actual fix. (You can connect indoors — see below.)
Connecting — there's no pairing
The rover uses Bluetooth Low Energy, and Archer connects to it directly from inside the app. There's no pairing, no PIN, and no bonding — and you should not add it from your phone's system Bluetooth settings (it won't even show up there).
-
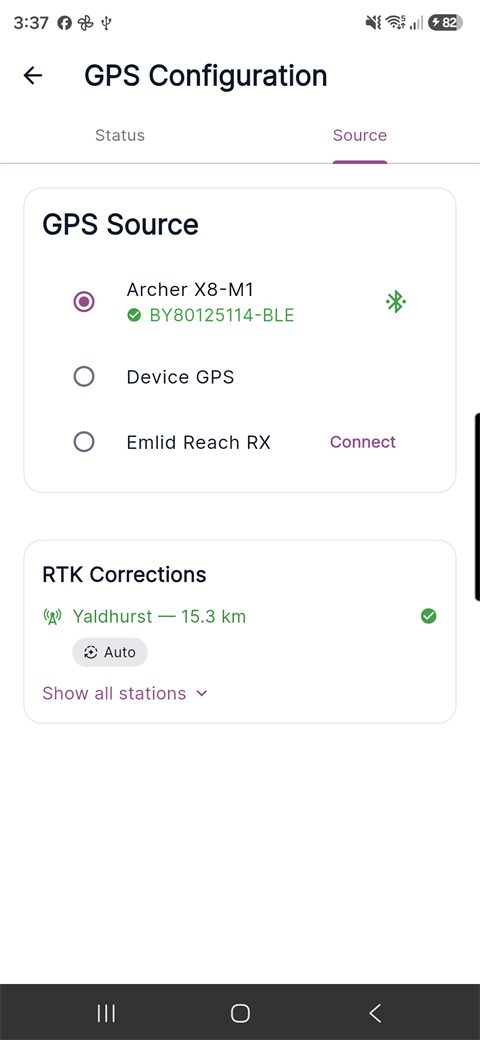
Open the menu (☰) and tap GPS Configuration.
-
On the Source tab, find Archer X8-M1 and tap Connect.
-
Archer connects and configures the rover automatically. Switch to the Status tab (the left tab) to see it working.
Once connected, Archer automatically pulls RTK corrections from the nearest base station — shown in the RTK Corrections card on the Source tab. Leave it on Auto unless you need to pick a specific base.
💡 The RTK Corrections card only appears under Source once the X8-M1 is connected. Before that, it shows "Connect external GPS to enable RTK corrections."
💡 Connect indoors if you like. The Bluetooth link works with or without a position fix, so you can check the rover at your desk — you only need open sky to actually get a fix.
💡 One device at a time. The rover talks to a single phone (or computer) at once. While something else holds it, no other phone can see it.
Getting a fix
Open the Status tab (the left tab) to watch the rover work toward an accurate fix. With a clear view of the sky and data on your phone, the status moves through these stages:
| Status | What it means | Accuracy |
|---|---|---|
| No Fix | No position yet — still acquiring satellites. | — |
| GPS Fix | Basic GPS, no corrections yet. | A few metres |
| RTK Searching | Connected; corrections starting to apply. | Converging |
| RTK Float | Corrections applied, still settling. | Sub-metre |
| RTK Fix | Full RTK accuracy — ready to map. | Centimetre-level |
💡 RTK corrections depend on the base stations your server provides for your area — the app isn't locked to a region. Where no nearby base station is available, the rover holds at GPS Fix or RTK Float rather than reaching RTK Fix.
You're now ready to map a block or record trouble spots with full accuracy.
Reading the Status tab
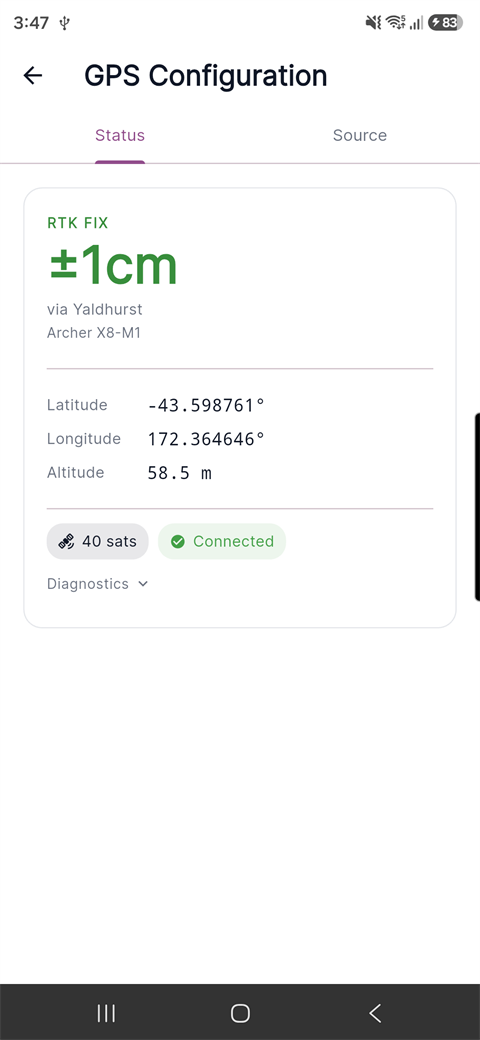
The Status tab is your live readout of how the rover is performing. At the top it shows the current fix state (such as RTK FIX) and the live accuracy as a single big number — for example ±1cm under RTK, or a value in metres before corrections lock in. When RTK corrections are applied, the line via <base station> shows which base station is feeding the rover.
Below that you'll find:
- Coordinates — Latitude, Longitude and Altitude for the current position.
- Status chips — the satellite count (e.g. 40 sats), a Connected / Disconnected indicator, and, on rovers that report it, the battery level.
📷 Screenshot: The Status tab hero — fix state (RTK FIX), large accuracy figure (±1cm), the "via [base-station name]" attribution line, coordinates, and the satellite / connection chips.
Diagnostics (for support calls)
Tap Diagnostics on the Status tab to expand a panel of technical details that's handy when you're on a call with support:
- Correction age — how fresh the RTK corrections are.
- Update rate — how often the rover is sending position data, in Hz.
- Last update — how long ago the last position arrived.
- BLE integrity — Bluetooth data quality (shown on the X8-M1).
- Provider — which GPS source is currently active.
📷 Screenshot: The Status tab with Diagnostics expanded, showing correction age, update rate, last update, BLE integrity and provider rows.
Choosing a base station manually
By default, RTK Corrections runs on Auto — Archer picks the nearest base station for you and re-selects automatically if one drops out. You can override this and lock the rover to a specific station, which is useful when you want a known reference or you're troubleshooting coverage.
On the Source tab, in the RTK Corrections card (the rover must be connected for it to appear):
- The current base station is shown as <name> — <distance> km, with an Auto chip beside it.
- Tap Show all stations to list every station your server provides, sorted by distance.
- Tap a station to select it. The card switches to a Manual chip and the rover starts using that station.
- To go back to automatic selection, tap the ✕ on the Manual chip — it returns to Auto and picks the nearest station again.
- Tap Hide stations to collapse the list.
📷 Screenshot: The RTK Corrections card with "Show all stations" expanded, the selected station marked, and the Auto/Manual mode chip.
Troubleshooting
Archer can't find the rover
Almost always, something else is still holding the connection — and while it's held, the rover is invisible to everything else. In order:
- Disconnect any other device. Close Archer on other phones, and turn off Bluetooth (or close the setup software) on any computer the rover was configured on.
- Power-cycle the rover. Off, wait a few seconds, on. This makes it start advertising again so a new phone can find it.
- Wait up to a minute, then connect in Archer on the one phone you want to use.
💡 A second phone quietly auto-reconnecting in someone's pocket is the most common reason a rover "disappears."
Connected, but no position
Give the rover a minute with a clear view of the sky. If it still shows No Fix, power-cycle it and reconnect — a fresh start clears it up.
Stuck on RTK Float, never reaches RTK Fix
- Get a clearer view of the sky — away from buildings, sheds, and dense canopy.
- Check your phone has a working data signal (that's how corrections reach the rover).
- Confirm a base station is available for your area. On the Source tab, open RTK Corrections → Show all stations and check there's a station reasonably close by.
- Tap Diagnostics on the Status tab to read correction age, update rate and connection details — useful figures to share on a support call.
Nothing connects at all
- Make sure Bluetooth is on and Archer has permission to use Bluetooth / nearby devices.
- Toggle Bluetooth off and on, then tap Connect again.
- As a last resort, power-cycle both the rover and the phone.
Tips
- Connect indoors, fix outdoors. Check the rover at your desk; head outside when you need a position.
- One phone per rover. When setting up several units, keep one phone live near them at a time so they don't grab each other's rovers.
- A power-cycle clears most problems. Can't find it, won't fix — off and on again is the fastest reset.